
- By admin
- In Uncategorized
- Tags Design
A-Z Guide to Kitchen Island Design
The Heart of Every Great Chicago Kitchen: Island Design Done Right
Kitchen island design is one of the most impactful decisions you’ll make in any kitchen remodel — and one of the most commonly misplanned.
Here’s a quick snapshot of what great kitchen island design covers:
| Element | Key Guideline |
|---|---|
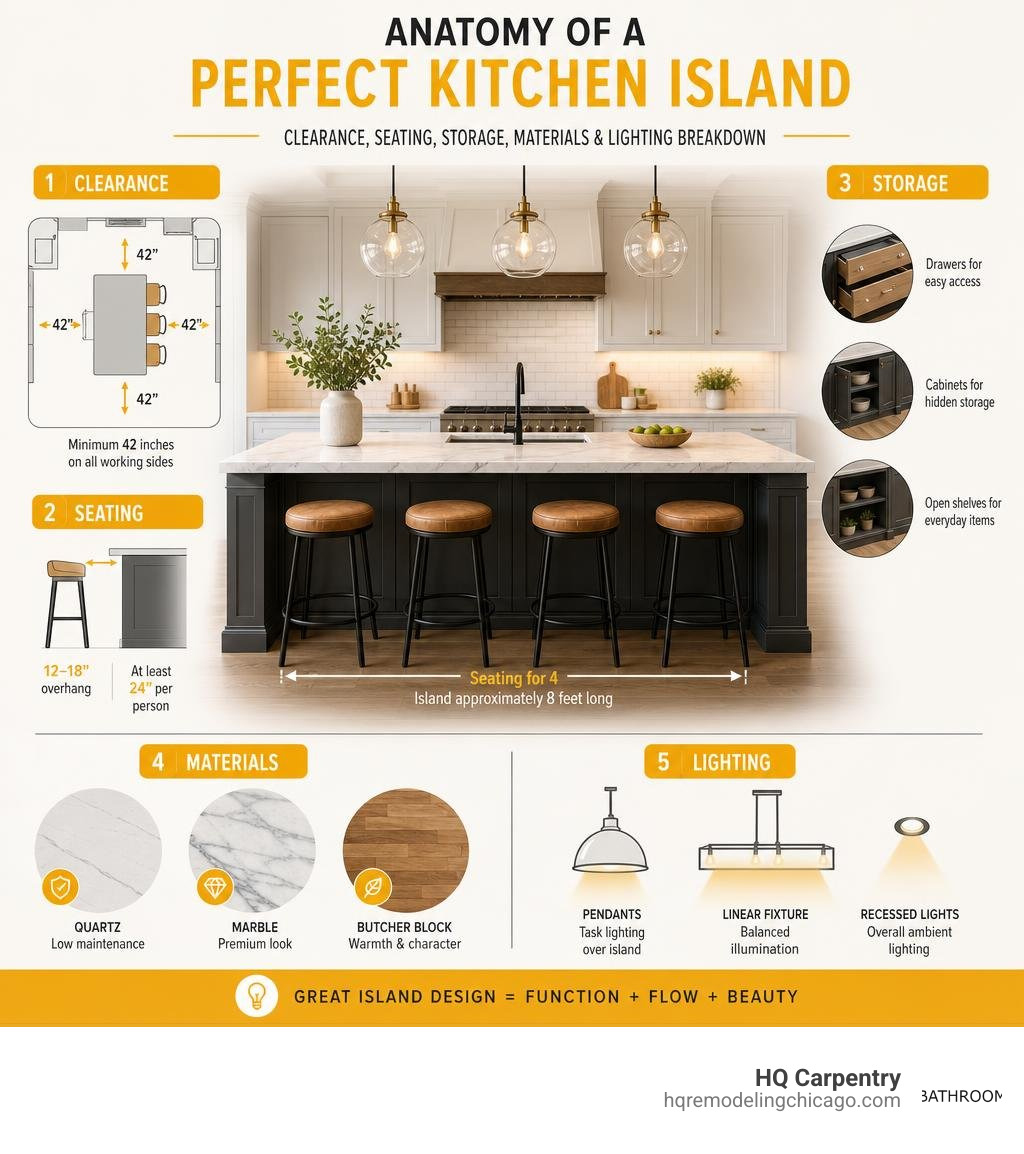
| Minimum clearance | 42 inches on all working sides |
| Island size limit | No more than 10% of total kitchen floor space |
| Seating width | At least 24 inches per person |
| Seating overhang | 12–18 inches from counter edge |
| Standard height | 36 inches for prep; 42 inches for bar seating |
| Countertop material | Quartz (low maintenance), marble (premium), butcher block (warmth) |
| Seating capacity for 4 | Island should be approximately 8 feet long |
Whether you’re renovating a Chicago bungalow in Lincoln Park, opening up a galley kitchen in Evanston, or building out a luxury kitchen on the North Shore, the island is the functional and visual hub of the entire space.
More than 2 in 5 homeowners choose islands 7 feet or longer. Yet size alone doesn’t make an island work — proportion, clearance, function, and materials all have to come together.
This guide walks you through every decision, from sizing and materials to appliances and lighting, so your island earns its place in the room rather than just filling it.
Sizing, Clearance, and Spatial Planning
The single most common mistake in kitchen design is trying to squeeze too much island into too little room. We have visited homes across Park Ridge and Arlington Heights where homeowners fell in love with a massive showroom display, only to find their actual kitchen felt like an obstacle course once the island was installed.
To prevent this layout regret, we follow strict National Kitchen & Bath Association (NKBA) guidelines and local Chicago area building requirements. The golden rule of spatial planning is that your island should never occupy more than 10 percent of your kitchen’s total square footage. If your kitchen is under 150 square feet, a large built-in island will likely overwhelm the space, and we might look at peninsulas or mobile prep carts instead.
The Magic Clearance Numbers: 42 and 48 Inches
Before you choose cabinet colors or countertop stone, you must map out your clearance zones. Clearance is the distance between the edge of your island countertop and the nearest obstacle — whether that is a perimeter countertop, a wall, or a major appliance.
- 42 Inches (106 cm): This is the absolute minimum clearance for single-cook households. It provides enough breathing room to walk past open cabinet doors and allows for standard traffic flow.
- 48 Inches (122 cm): If you live in a busy household in Wilmette or Winnetka where multiple people prep meals simultaneously, 48 inches is the standard we design for. This allows one person to work at the range or sink while another comfortably passes behind them.
Always measure your clearance with appliance doors fully open. A 36-inch aisle might feel fine on paper, but the moment your dishwasher door drops down or your French-door refrigerator swings open, that aisle is completely blocked.
Seating Ergonomics and Overhangs
An island that is uncomfortable to sit at quickly becomes a wasted asset. To design a functional seating area, you must plan for both linear width and knee clearance.
- Width Per Seat: You must allow a minimum of 24 inches (61 cm) of width per person. If you want to line up four stools comfortably, your island must be at least 8 feet (96 inches) long.
- Knee Overhang: For standard counter-height seating (36 inches high), your countertop needs a 12- to 15-inch overhang to keep knees from knocking against the back paneling of the cabinets. If you opt for bar-height seating (42 inches high), a 12-inch overhang is usually sufficient, but you must ensure your bar stools are paired correctly.
- Support Brackets: Any countertop overhang that extends beyond 12 inches requires hidden steel support brackets mounted to the cabinetry sub-frame to prevent cracking, especially when using heavy natural stones.
| Island Length | Recommended Max Seats | Minimum Island Width (No Seating) | Minimum Island Width (With Seating) |
|---|---|---|---|
| 5 Feet (60″) | 2 | 24″ | 36″–42″ |
| 7 Feet (84″) | 3 | 24″ | 36″–42″ |
| 8 Feet (96″) | 4 | 30″ | 42″–48″ |
| 10 Feet (120″) | 5 | 30″ | 48″+ |
Tailoring Your Kitchen Island Design to Chicago Layouts
The architecture of your home dictates your kitchen layout, and your layout dictates your kitchen island design. Because we work extensively with historic Chicago bungalows in Niles, historic homes in Oak Park, and modern builds in Glenview, we know there is no one-size-fits-all footprint.
The L-Shaped Kitchen: The Perfect Island Match
L-shaped kitchens are the natural partners of the central island. Because the workspace is pushed to two adjacent walls, the center of the room remains wide open. An island here acts as the missing link in your work triangle, offering a perfect landing zone for prep. If you have an L-shaped kitchen, you can read our detailed breakdown on maximizing this footprint in Island Life: Creative Design Ideas for a 12×16 Kitchen Layout.
The U-Shaped Kitchen: Watch the Width
U-shaped kitchens can easily accommodate an island, but only if the room is wide enough. To place an island inside a U-shaped layout, the opening between the two parallel runs of cabinets must be at least 10 feet wide. If it is narrower, the island will choke the space and prevent you from opening opposing cabinet doors. For homeowners in Glenview looking to optimize this specific flow, utilizing professional kitchen design services is the best way to ensure your measurements are precise before ordering custom cabinets.
The Galley and One-Wall Kitchen: Keeping Things Open
In historic Chicago homes or modern West Loop condos, we often work with one-wall or galley layouts. Here, an island can act as a crucial divider between the kitchen and the living space. In a one-wall layout, the island creates a parallel working surface, essentially turning the space into a highly efficient galley kitchen while keeping the opposite side open for entertaining. If you are planning a remodel in historic neighborhoods, working with a specialist in kitchen island remodeling in Oak Park can help you preserve historical charm while introducing modern spatial flow.
Essential Rules of Kitchen Island Design
Every successful island must have a clear primary job. If you try to make your island a prep station, a dining table, a cooking zone, a wet bar, and a storage unit all at once, it will perform none of those jobs well.
The Kitchen Work Triangle
The classic work triangle connects your sink, refrigerator, and cooktop. When introducing an island, you must ensure that no leg of this triangle cuts directly through the island block.
If your island is too long or misplaced, you will find yourself constantly walking around it just to get from the fridge to the stove. To keep the workflow natural, the total distance of the three legs of your work triangle should be between 25 and 30 feet, with the island serving as a helpful helper rather than a barrier.

Prep Zone vs. Social Zone
If you plan to use your island for both cooking prep and social gathering, we highly recommend dividing the surface into distinct zones. This can be achieved visually or structurally:
- Dual-Height Countertops: Designing a split-level island with a 36-inch-high prep surface on the kitchen side and a raised 42-inch-high bar on the living side is an excellent way to shield your guests from prep mess and splashes while keeping them close to the action.
- Visual Separation: If you prefer a seamless, single-level flat countertop, use a large, quiet surface of quartz or stone. You can dedicate one half of the island to clean prep space and the other to seating, keeping the sink or cooktop off-center to protect the social zone. For a deeper dive into balancing these zones, explore the technical insights in the Kitchen Island Design Guide | Fadior Journal .
Storage Optimization: Drawers Over Doors
When we design the base of an island, we almost always prioritize deep drawer banks over standard door-and-shelf cabinets. Deep drawers pull completely out, allowing 360-degree visibility and easy access to heavy pots, pans, and small appliances without requiring you to get on your knees to search the back of a dark cabinet.
To maximize functionality, we integrate specialized storage solutions:
- Pull-Out Trash and Recycling Bins: Always place these close to your prep sink or main workspace.
- Vertical Cookie Sheet Dividers: Excellent for keeping baking pans organized.
- Built-In Spice Drawer Inserts: Keeping your spices flat and labeled right below your main prep surface makes cooking a breeze.
- Accessible Storage: For families planning for multi-generational use or aging-in-place, we often locate heavy serving platters and frequently used dishes in lower island drawers where they can be reached easily without lifting items from high wall cabinets, a design principle that ensures long-term accessibility and comfort.
Cabinetry and Color Contrast Strategies
Should your kitchen island match your perimeter cabinets? While matching cabinetry offers a traditional, cohesive look, the top trend in modern kitchen design is the contrasting island base.
Using a contrasting color or wood tone on your island turns it into a beautiful furniture-like focal point. In 2026, we are seeing a strong shift away from the cool grays of the last decade. Instead, homeowners in Glencoe and Elmhurst are embracing rich, organic tones:
- Navy Blue and Sage Green: These colors pair beautifully with white or soft cream perimeter cabinets, adding depth and sophistication to the space.
- Warm Wood Tones: Natural oak, walnut, and cherry bases bring warmth and texture into stone-heavy kitchens, breaking up the coldness of all-white designs.
For a stunning example of how a contrasting island can elevate a home’s architecture, look at this Modern Tudor – Glencoe, IL – Transitional – Kitchen – Chicago – Houzz project, which showcases how contrasting tones anchor a transitional space.
Material Selection: Countertops and Cabinetry
Because your island is highly visible from adjacent living spaces, your choice of countertop material is a major design statement. It is also the hardest-working surface in your home, meaning durability must match your lifestyle.
Quartz: The Modern Standard
Engineered quartz remains the most popular choice for kitchen islands, and for good reason. It is non-porous, stain-resistant, scratch-resistant, and requires absolutely no sealing. For busy families in Skokie or Elmhurst, quartz offers peace of mind against spilled juice, wine, or hot sauce.
Honed Marble: The Premium Classic
Nothing matches the natural, soft beauty of real marble. However, marble is porous and prone to etching (dulling from acidic liquids like lemon juice or vinegar). If you love the natural patina that develops over time, marble is a gorgeous choice, but it requires regular sealing and careful maintenance. To understand how to balance these classic materials with modern performance, read our guide on Kitchen Remodeling in Chicago: Going from Trendy to Classic.
Butcher Block: Warmth and Utility
A wood or butcher block countertop adds immediate warmth and rustic charm. While some homeowners use butcher block for the entire island, many opt to use it as an accent section — such as a built-in chopping block at one end of a quartz island. Wood requires regular oiling with food-safe mineral oil to prevent drying and cracking. If you love the warmth of wood, you can view a beautiful example of a handmade wood top in this DIY Kitchen Island with Butcher Block Top – ADDICTED 2 DIY project. That while DIY guides are great for design inspiration, a heavy, custom-built island requires professional joinery and structural support to ensure it remains stable and safe for daily use.
Stainless Steel and Concrete: Industrial Edge
For a sleek, contemporary, or semi-industrial look, concrete or stainless steel are excellent choices. Stainless steel is incredibly hygienic and durable, which is why it is the standard in professional kitchens. Concrete offers a textured, architectural feel but must be poured correctly and sealed to prevent staining.
Modern Trends in Kitchen Island Design
As we move through 2026, several exciting design innovations are redefining the modern kitchen island:
- Waterfall Edges: A waterfall countertop extends vertically down the sides of the island all the way to the floor, creating a continuous, seamless block of stone. This looks spectacular with heavily veined quartz or marble and is a favorite in modern West Loop condos.
- Curved Profiles: Instead of sharp, 90-degree corners, designers are embracing soft, rounded, and curved island ends. Curved islands improve traffic flow in open-concept spaces and are much safer for households with young, active children.
- Mixed Materials: Rather than using a single material, we are seeing islands that combine a quartz prep area with an attached lower wood dining table, creating a beautiful contrast in both height and texture.
- Integrated LED Lighting: Adding under-cabinet LED strip lighting along the toe-kick of your island creates a beautiful floating effect at night, serving as both ambient lighting and a safe path-marker. You can see these clean, contemporary lines executed in the Evanston Clean & Eclectic project, which perfectly balances modern trends with functional warmth.
Appliance Integration and Functional Zones
Integrating appliances into your island is an excellent way to free up perimeter wall space and keep the cook facing family and guests. However, doing so transforms your island from a simple carpentry installation into a complex plumbing, electrical, and HVAC project.
Sinks: Prep vs. Cleanup
Placing a sink in the island is highly functional, but you must choose its purpose carefully:
- The Prep Sink: A small, secondary basin is ideal for rinsing vegetables and filling pots, keeping the main cleanup zone on the perimeter.
- The Main Sink: If you place your primary sink in the island, you must also place your dishwasher next to it to prevent water from dripping across the floor. That a main cleanup sink means dirty dishes will often be on display in open-concept layouts.
Cooktops and Ventilation
An island cooktop allows you to face your guests while cooking, but ventilation is a key challenge. Because there is no wall behind the cooktop, you must choose between:
- An Overhead Island Hood: This makes a bold architectural statement but can block sightlines across the room.
- A Downdraft Vent: These units are built into the cooktop or rise up from the countertop behind the burners, pulling steam and grease down through ductwork in the floor.
- Induction Cooktops: Highly recommended for islands because they are incredibly energy-efficient, easy to clean, and cool to the touch within minutes, making them much safer around seated guests.
Hidden Conveniences: Outlets and Microwaves
According to local building codes, any permanent kitchen island must have electrical outlets installed. Instead of putting standard white plastic outlets on the ends of beautiful wood cabinetry, we integrate flush-mounted, color-matched outlets or pop-up outlet towers that sit discreetly in the countertop itself.
Additionally, placing a microwave drawer or a beverage fridge in the island base keeps these appliances below eye level, preserving a clean, modern aesthetic. For a deep dive into how to design these family-friendly, multi-functional zones, check out the Ohana Island Kitchen: Your Complete Guide to Designing a Family-Friendly Heart of the Home – Revitaink guide.
Frequently Asked Questions about Kitchen Islands
What is the minimum clearance needed around a kitchen island?
The absolute minimum clearance required for basic safety and circulation is 36 inches, but we highly recommend a minimum of 42 inches on all working sides of the island. If your kitchen regularly accommodates multiple cooks, or if the island sits adjacent to a major appliance door (like an oven or dishwasher), you should aim for 48 inches of clearance to ensure comfortable traffic flow and prevent physical bottlenecks.
Should a kitchen island match the surrounding cabinets?
No, your island does not have to match your perimeter cabinetry. While matching cabinetry offers a cohesive, traditional look, opting for a contrasting island base (such as navy blue, sage green, or warm walnut) with a matching or contrasting countertop is a highly popular way to create a stunning visual focal point. The key is to maintain a cohesive design language by repeating hardware finishes, countertop materials, or lighting styles throughout the space.
Can you put a cooktop or sink on a kitchen island?
Yes, you can absolutely integrate a cooktop or sink into your island. Doing so can significantly improve your kitchen’s work triangle and keep you facing your guests while prepping or cooking. However, keep in mind that this requires running plumbing lines, dedicated electrical circuits, and potentially gas or ventilation ductwork through your subfloor. This level of technical mechanical planning should always be handled by professional contractors before any cabinetry is ordered.
Work with Chicago’s Premier Remodeling Team
A beautifully designed kitchen island can completely transform how you live, cook, and gather in your home. But because a successful design requires a perfect balance of spatial planning, structural adjustments, plumbing, electrical work, and custom carpentry, it is a project that deserves professional expertise.
At HQ Carpentry, founded by Tomasz Pietrzyk with over 15 years of hands-on industry experience, we have been helping homeowners across Chicago and the North Shore suburbs bring their dream kitchens to life since 2011. As a fully licensed and insured remodeling contractor with a 5.0 Google Reviews rating, we specialize in delivering personalized, full-service home makeovers.
Whether you need a full kitchen remodeling project, custom cabinet installation, structural adjustments to open up your layout, or help with building permit acquisition, our expert team is here to guide you through every step of the process.
We proudly serve homeowners in:
- Chicago (including Lincoln Park, West Loop, and Hyde Park)
- Skokie, Niles, and Lincolnwood
- Evanston, Wilmette, Winnetka, and Glencoe
- Glenview, Northbrook, and Arlington Heights
- Oak Park, Elmhurst, Oak Brook, Downers Grove, and Burr Ridge
Ready to start planning your perfect kitchen island? Explore our complete range of services on our Kitchen Remodeling Chicago page.
Contact us today through hqremodelingchicago.com to schedule a consultation and get a free estimate for your project!